
Everyone wants a tender and mouthwatering ribeye roast. This cut is famous for its juicy texture and bold flavor. Yet, many home cooks ask: “Should I sear a ribeye roast before cooking?” The quick answer is: Yes, searing can boost taste and texture in your roast. However, there is a bit more to learn.
In this article, we will explore the art of searing. We will also explain why a golden-brown crust can make your roast more delicious. Moreover, we will discuss the best techniques, equipment, and timing. Indeed, it is not just about flavor. It is also about presentation and confidence in your cooking skills.
Keep reading, and you will discover easy steps to create a showstopping centerpiece. By the end, you will feel eager to fire up your stove and produce a perfectly seared ribeye roast. Let’s begin.
Why Sear a Ribeye Roast Before Cooking?
You may notice chefs on TV shows searing large cuts of meat in piping-hot pans. They often talk about “locking in juices” or “building a savory crust.” But does searing really do all these things?
In short, searing changes the surface of the roast. It causes browning and caramelization. We call that the Maillard reaction. While it does not literally seal in every drop of moisture, it does keep the outer layer more appetizing. This reaction makes proteins and sugars interact to form new flavor compounds. Thus, your roast gains a deeper, richer taste.
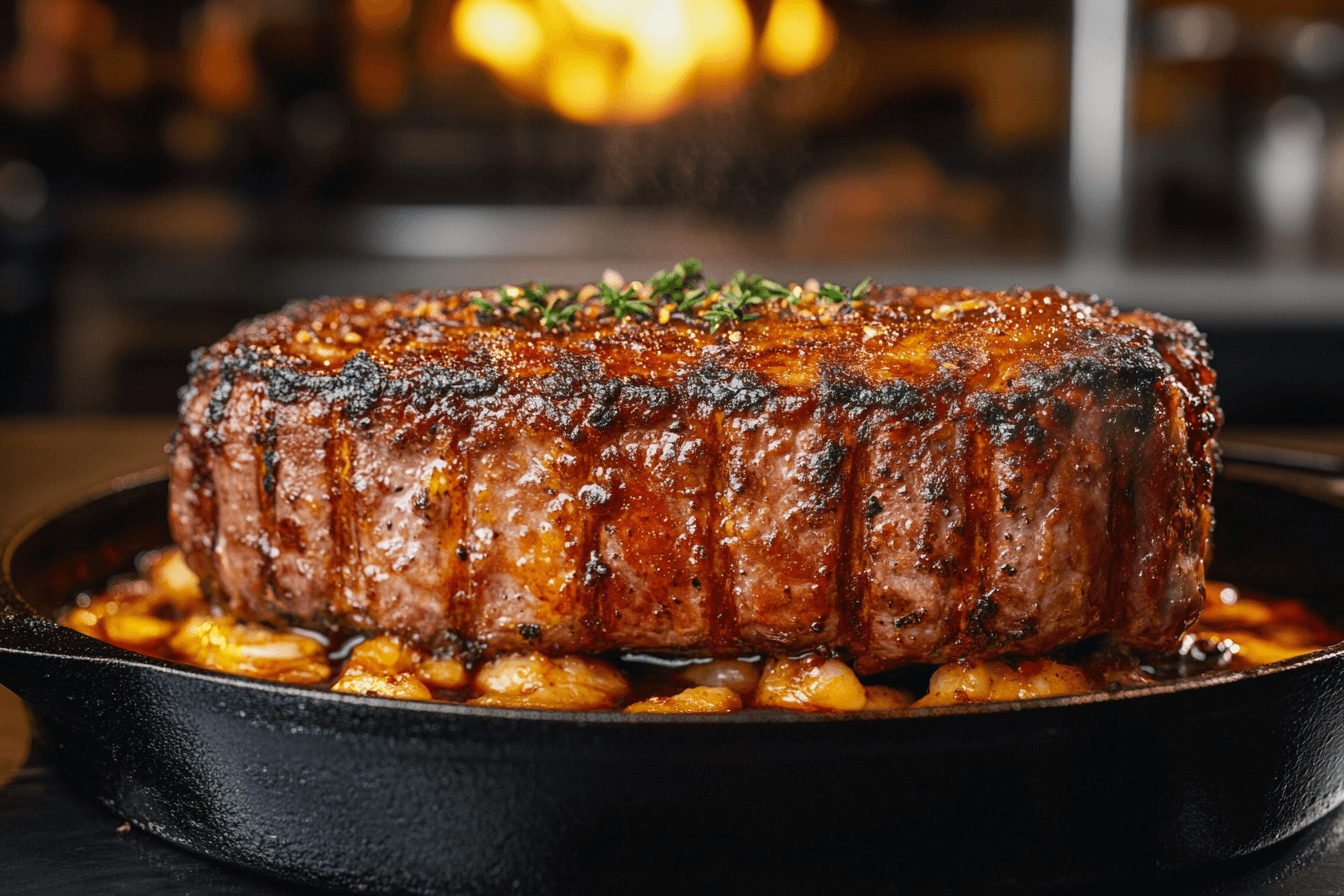
Searing also adds visual appeal. The crust looks lovely and entices your guests. When you place a well-seared ribeye roast on the table, it suggests expertise and care. Moreover, it offers a nice contrast between the crisp exterior and tender interior.
Benefits of a Golden-Brown Crust
A stunning crust serves more than looks. It also creates texture. With each bite, you get both crunch and succulence. Furthermore, this technique works with different types of roasts. It applies well to prime rib or other bone-in cuts, too.
Searing can help the seasonings cling to the roast. Indeed, a browned exterior keeps your herb rub or marinade in place. As a result, you get a more uniform flavor with each slice. So, if you wonder whether you should pre-brown or not, consider these benefits. They often tip the scale in favor of searing.
Key Techniques for Searing a Ribeye Roast
Searing a ribeye roast sounds simple. Yet, there are a few details that can make or break your outcome. Do not worry, though. The steps are easy to follow. In fact, once you learn them, you will wonder why you ever skipped this process.
The Right Equipment
You might ask: “Which pan is best for searing?” A heavy-duty cast-iron skillet works wonders. It retains heat well and spreads it evenly. Yet, a stainless-steel or carbon-steel pan also works if it can handle high temperatures. The key is to use a pan that gets hot and stays hot.
Moreover, you need an oven-safe option. This way, you can move from stovetop to oven without switching pans. By doing so, you avoid letting the roast rest too long, which helps maintain its temperature.
Prep the Roast
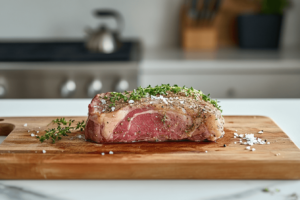
You may want to pat your ribeye roast dry before cooking. Moisture on the surface hinders browning. Next, season the roast with salt and pepper. Some chefs prefer a simple salt-pepper mix. Others add garlic powder or onion powder. Feel free to use your favorite rub. The key is to coat it well.
While you can let the roast sit at room temperature for a bit, do not leave it out too long. It is wise to keep food safety in mind. Still, allowing the roast to lose a bit of its chill helps it cook more evenly.
Heat the Pan Properly
First, set your pan on the stove and turn the heat to medium-high. Next, add a small amount of high-heat oil. Avocado oil or canola oil often works well because of their higher smoke points. Then, wait until the oil glistens and forms slight ripples.
At this point, place the roast in the pan. Avoid crowding the meat. You want enough space around it so that the heat can circulate. Be cautious. Oil can splatter, so use tongs or kitchen mitts for safety.
Achieving the Perfect Sear
Cook each side of the roast until you see a deep brown crust. This usually takes two to three minutes per side. However, thicker or larger cuts may take a bit longer. Keep an eye on the color rather than focusing on just the timer.
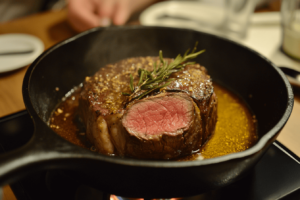
Use transition words to guide your approach. For example, first sear one broad side. Next, rotate to another side. Then, keep moving the roast until you have an even crust all around. Do not forget the ends. Once done, you can place the skillet into a preheated oven to finish cooking.
When to Sear a Ribeye Roast: Before or After?
Some chefs opt for searing after the roast is nearly done in the oven. This method is known as the reverse sear. Others prefer to sear it first, then transfer it to the oven. Is one better than the other?
Should I Brown a Ribeye Roast Before Cooking?
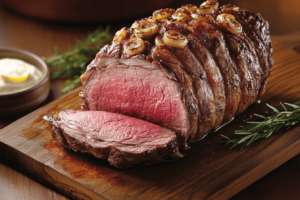
Many experts praise the initial sear. They believe it imparts a deeper flavor from the start. Additionally, it lets the roast develop a crust before the interior reaches your desired doneness. With this method, you often get a nice ring of browning around each slice.
Also, searing first can be simpler. After browning, you pop the roast in the oven. You can then set a timer, check the temperature, and remove it once you reach the perfect internal doneness. The roast also benefits from resting, which you can manage while you finish side dishes.
Reverse Sear Method
On the other hand, some cooks prefer the reverse sear. First, they cook the roast low and slow in the oven. Then, they finish with a quick sear in a hot pan. Proponents say this approach yields a more uniform center. They claim it avoids the chance of over-browning or burning.
However, keep in mind that the roast might rest a bit too long after the initial oven stage. If you are not careful, it can cool down. That means you might have to sear it more aggressively. This could create a slight risk of a burnt crust.
Overall, both methods can work. Each method has pros and cons. So, it boils down to personal taste. Yet, searing first is often simpler and remains a solid choice for most home cooks.
Seasoning and Flavor Options
A plain salt and pepper seasoning is classic. However, you may wish to explore more flavors. Indeed, adding garlic, herbs, or a favorite spice blend can elevate your roast.
Popular Spice Blends
- Rosemary-Garlic Rub: Mix minced rosemary, garlic, salt, and pepper. Rub it on the roast before searing.
- Herb de Provence: A blend of thyme, savory, and lavender. It adds a floral note.
- Smoky Paprika Mix: Combine smoked paprika with cumin, garlic powder, and a hint of cayenne. This adds a warm, earthy taste.
Feel free to experiment. Still, do not go overboard. A ribeye roast has a bold beefy flavor that stands on its own. Too many spices might mask that natural taste.
Marinades and Brines
While not always required, marinating can be a fun option if you want a unique twist. You can soak the roast in a simple marinade of olive oil, herbs, and citrus. However, do not let it sit too long. Extended marinating can alter the texture. A few hours are usually enough.
A dry brine is another approach. Simply salt the roast and let it rest uncovered in the fridge for a few hours or overnight. This helps the salt penetrate the meat. It also dries the surface, which promotes a better sear.
Optimal Cooking Times and Temperatures
Many cooks wonder about the ideal cooking temperature. Some prefer 350°F, while others like a slightly lower 325°F. The choice depends on how much time you have and how large your roast is.
Internal Temperature Guidelines
- Rare: 120°F to 125°F
- Medium-Rare: 130°F to 135°F
- Medium: 140°F to 145°F
- Medium-Well: 150°F to 155°F
- Well-Done: 160°F and above
For the best results, aim for medium-rare or medium. This range preserves juiciness without being too raw. Insert a meat thermometer into the thickest part of the roast to check doneness.
Resting Period
Once the roast hits your target internal temperature, remove it from the oven. Then, place it on a cutting board. Tent it with foil and let it rest for about 15 to 20 minutes. This step is crucial. The meat continues cooking slightly, and the juices settle back into the fibers. As a result, you get a moist and flavorful slice.
If you skip resting, you may lose more juices when you cut. That can lead to a drier roast. Thus, be patient. The resting stage is well worth it.
Common Mistakes and How to Avoid Them
Mistakes happen in the kitchen. Still, being aware of them helps you sidestep trouble. Here are a few pitfalls:
Overcrowding the Pan
Many people try to sear a large roast in a small skillet. This can lower the temperature of the pan. Consequently, you get steaming instead of searing. Rather, choose a skillet that has enough room. If you are cooking more than one roast at a time, sear them separately.
Using Too Much or Too Little Oil
Finding the right oil balance can be tricky. You need enough to cover the surface but not so much that you drown the roast. Also, use oils suited for high heat. Butter, for example, burns quickly at high temperatures, unless clarified. If you want butter flavor, add it near the end of the searing process.
Not Monitoring Heat Levels
Sometimes, people crank the heat too high and burn the surface. Other times, they keep the heat too low, resulting in a pale crust. Adjust your stove to maintain a steady, intense heat. Watch the roast carefully, and if you see the color getting too dark too soon, lower the flame slightly.
Alternative Methods: Grilling and Broiling
If you do not want to sear on the stovetop, you can achieve a crust through grilling or broiling. Each method has benefits.
- Grilling: Preheat your grill to high. Sear the roast on each side for a few minutes. Then, move it to a cooler part of the grill to finish cooking.
- Broiling: You can also place the roast under a broiler for a short time. Watch it closely, as the high heat can burn the exterior if you are not attentive.
Still, the stovetop sear remains the most precise. You can see and control the crust formation in real time. Yet, exploring these alternatives can be fun for special occasions or for adding a smoky twist.
Pro Tips for a Perfectly Seared Ribeye Roast
- Room-Temperature Meat: Let the roast sit out for about 30 minutes before searing. This leads to even cooking. However, do not exceed food safety guidelines.
- Pat Dry: Moisture on the surface stops browning. Thus, pat the roast with paper towels before seasoning.
- Use High Heat Oil: Avocado, canola, or grapeseed oil handles high heat.
- Season Generously: A thicker roast can handle a bold rub. Yet, be mindful of salt. You can always add more later.
- Preheat Your Oven: While you sear, let the oven reach its set temperature. Transfer the roast promptly so it does not cool.
- Thermometer Accuracy: Use a reliable digital thermometer. Insert it into the thickest area and avoid bones or large pockets of fat.
- Rest, Rest, Rest: After you remove it from the oven, allow time for the roast to settle. Slicing too early leads to dryness.
Serving Suggestions
A seared ribeye roast can be the star of any table. Yet, side dishes can enhance the experience. Try serving it with:
- Mashed Potatoes: Creamy and comforting, they pair well with the roast’s rich flavors.
- Green Beans: Lightly sauté them with garlic and butter. The crispness offers a welcome contrast.
- Yorkshire Puddings: A traditional English side. They are airy, savory pastries that soak up juices.
- Roasted Vegetables: Carrots, onions, and bell peppers taste amazing after spending time in the oven with the roast.
For a final touch, consider a simple pan sauce. You can deglaze the roasting pan with broth or wine. Add a pat of butter, some aromatics, and reduce it until it thickens.
Frequently Asked Questions
How long to sear ribeye before oven?
Aim for two to three minutes on each side to build a good crust. Thicker cuts may need an extra minute or two per side. Always watch the color. A deep brown surface means it is ready for the oven.
Is it better to sear a roast before cooking?
Yes, searing first often gives you a richer crust and deeper flavor. It also helps the roast cook more evenly once you move it to the oven.
Should I sear a prime rib roast before baking?
Yes, a prime rib roast benefits from searing. The browning adds flavor and visual appeal. It creates a nice barrier that makes each slice taste better.
Do you sear a ribeye roast first or last?
Many prefer to sear first, then finish in the oven. However, the reverse sear approach also works. It depends on your cooking style and time.
Conclusion
A ribeye roast is one of the most tender and flavorful cuts you can serve. Searing it first is often the best way to achieve a stunning, crisp exterior. Moreover, it heightens the savory taste that draws people in. You can try different spice blends or even marinade options. Yet, the basic method remains simple and reliable.
Whether you are cooking for a holiday gathering or a cozy Sunday meal, a seared ribeye roast will impress. It looks elegant and tastes incredible. So the next time you ask, “Should I sear a ribeye roast before cooking?”, the answer is yes. Go ahead, sharpen your knives, and enjoy that unforgettable crust.