
Introduction
Chocolate bars captivate almost everyone. They offer a sweet escape from daily routines and light up celebrations. They also seem to hold an air of mystery. After all, how does a simple cocoa bean transform into that smooth, mouthwatering treat? Many people wonder: What are the steps of making a chocolate bar? Here, we will explore each stage of this fascinating process. You will learn how quality ingredients and careful methods work together to create those delicious bars we cherish.
Moreover, this guide will show you why each step matters. We will focus on how cocoa beans go from farms to factory lines. We will also explain the role of roasting, conching, and tempering. By the end, you will see that creating your own chocolate bar is both science and art, all wrapped up in sweet harmony. You can try these techniques at home, or you can simply read on to appreciate the craft behind your favorite brand.
In addition, we will go through simple tips that help reduce complexity, so you do not feel overwhelmed. At each step, you will notice the importance of timing and balance. This combination of precision and creativity sets chocolate-making apart from other sweet confections. Furthermore, using smooth transitions will make these steps easy to follow. Let’s begin our journey into chocolate-making and discover how those tasty bars come to life.
Understanding the Steps of Making a Chocolate Bar
At its core, the chocolate-making process turns raw cocoa beans into a rich, creamy treat. Although large factories produce chocolate on a grand scale, you can still follow the same sequence at home. But how exactly does this happen, and why is each phase essential?
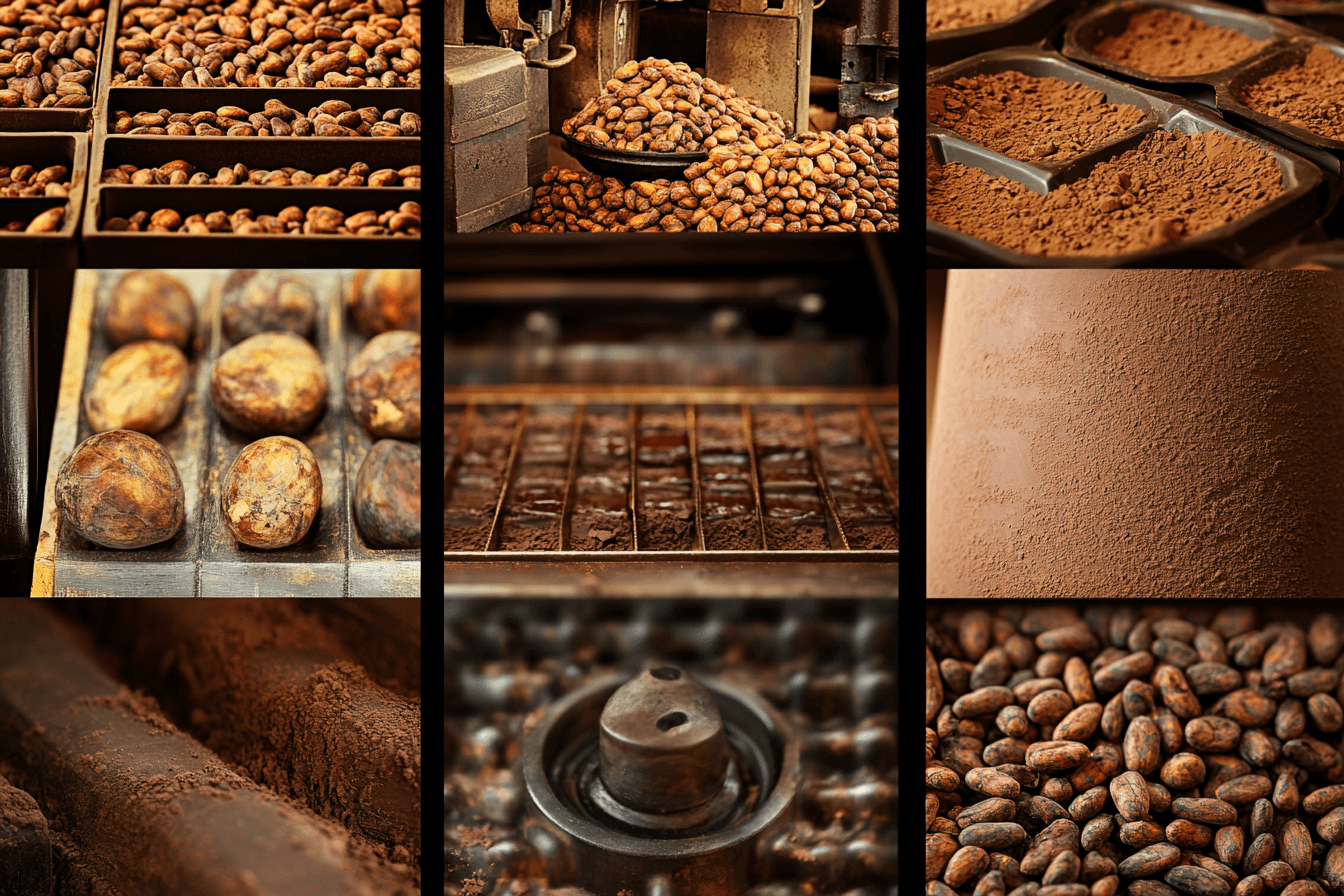
First, it starts with sourcing cocoa beans from tropical regions, often near the equator. These beans grow in pods on the cacao tree. Farmers harvest and break the pods open, revealing the white, pulp-covered beans inside. Then they ferment and dry these beans to develop that unique chocolate flavor. As a result, the beans become ready for the next steps.
Next, manufacturers or home artisans clean and roast the beans. Roasting is crucial, because it removes unwanted bacteria and helps release flavor compounds. Once roasted, the beans move on to winnowing, which separates the outer shells from the cocoa nibs. After that, the nibs grind into a paste called chocolate liquor. This stage sets the foundation for every chocolate bar.
Moreover, to create a refined and smooth texture, the chocolate liquor often needs conching. Conching stirs the liquor at controlled temperatures to improve flavor and reduce bitterness. Finally, tempering is key, as it controls how the cocoa butter crystallizes. This step ensures each chocolate bar has that signature snap and glossy shine. When everything is done, you can pour the chocolate into molds and let it set, completing your journey from bean to bar.
Selecting the Finest Beans for the Chocolate-Making Process
High-quality beans are the building blocks of any great chocolate bar. Yet many people overlook this detail. Indeed, the flavor, aroma, and even texture of your chocolate start with the beans. There are three main varieties: Criollo, Forastero, and Trinitario. Criollo has a delicate flavor and is often more expensive. Forastero grows widely and can taste stronger. Trinitario blends both flavor profiles. Thus, choosing the right bean variety sets you up for success.
Furthermore, farmers inspect beans by their appearance and aroma before packing. They also ensure the beans have fermented and dried to the proper level. Proper fermentation breaks down sugars and reduces any sour or sharp tastes. It adds complexity to the final chocolate. Drying, on the other hand, prevents mold and helps the beans hold flavor longer.
When buying beans, consider their origin. Different regions produce distinct flavor notes. Beans from Madagascar often taste fruity, while beans from Ghana can be more earthy. This nuance is part of the fun when you decide to craft your own bar. If you want consistency, source from a trusted supplier. Yet if you enjoy variety, try beans from multiple regions to discover your favorites.
After selecting premium beans, always store them in a cool, dry place. This precaution helps them keep their aroma and quality. Moreover, it ensures a more seamless roasting experience later. The extra care you give at this point will pay off in improved flavors.
Cleaning and Sorting: A Key Step in Creating a Chocolate Bar
Before you roast, you need to clean and sort your beans. This step removes debris like stones, twigs, and broken pieces. It also sorts out beans that did not ferment properly. Why is this critical? Because even one bad bean can impact the entire batch. Indeed, sorting might seem tedious, yet it pays off in flavor and safety.
Begin by spreading your beans out on a tray or a clean, flat surface. Then remove any visible dirt and foreign material. Next, set aside any beans that look moldy, discolored, or odd. At the same time, use your sense of smell. Beans that emit a sour or foul odor might be unfit for use. If in doubt, it is better to discard questionable beans.
Additionally, sorting helps maintain consistent roast quality. If you have uneven sizes, they will not roast at the same rate. Smaller beans will roast faster, risking a burnt taste. Larger beans might not get the proper heat exposure. Thus, group the beans by size if possible. This careful approach sets the stage for uniform roasting.
Finally, wipe off any surface dust. Make sure your workspace is free from contamination. This thorough cleaning might sound excessive, but it keeps your chocolate pure and free from unpleasant aftertastes. It also ensures the next step, roasting, runs smoothly without hidden surprises.
Roasting: Perfecting the Flavor of Your Chocolate
Roasting is an art. It transforms raw beans into cocoa nibs full of enticing aromas. Furthermore, roasting eliminates bacteria and moisture. Once you have cleaned and sorted your beans, preheat your oven or roaster to a temperature between 250°F and 300°F (about 120°C to 150°C). Spread the beans evenly on a baking sheet and roast them for 15 to 30 minutes. Keep a close eye, because beans can quickly over-roast and develop bitter flavors.
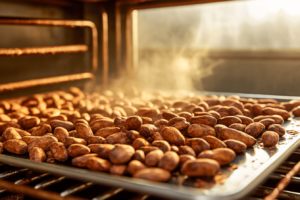
During the roast, open your oven door occasionally. Stir the beans to ensure even heat distribution. As the roast progresses, you might notice a chocolaty fragrance filling the kitchen. This aroma signals that you are on the right track. However, watch for changes in color. Over-roasted beans appear darker and might take on a burnt smell.
Moreover, each type of bean demands a slightly different roast profile. Some beans respond well to higher temperatures for a short time. Others improve with a slower, lower-temperature roast. Experiment with multiple batches to find what suits your taste best.
When you finish roasting, remove the beans from the heat. Spread them out on a cooling rack or tray. This prevents carryover cooking. Allow them to cool completely before the next step. Proper roasting sets up the rest of the chocolate-making process. Indeed, if you rush this step, you risk losing the sweet essence of your beans.
Winnowing and Grinding for a Smooth Chocolate-Making Process
Once your roasted beans have cooled, it is time to separate the nibs from the shells. This stage is known as winnowing. You can do this manually by cracking the beans and blowing away the shells, or you can use a winnowing machine. Either way, the goal stays the same: remove the inedible husk and collect the valuable nibs.
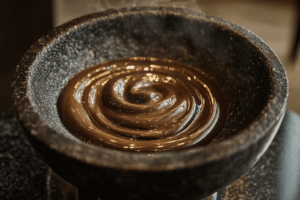
Furthermore, nibs are the pure core of the cocoa bean. They hold the flavor and cocoa butter needed for chocolate. After gathering nibs, the next phase involves grinding them into chocolate liquor. This paste is not yet sweet, but it contains all the essential elements to create a chocolate bar.
To grind, use a high-powered blender or specialized grinder. Start slow and then increase speed. The friction and heat will cause the nibs to release cocoa butter. Thus, you get a thick, smooth liquor. The process might take anywhere from 10 minutes to several hours, depending on your tools and desired texture.
Additionally, you can add sugar at this stage if you want a sweetened liquor. Some artisans prefer to add it later. Choose fine sugars to ensure smooth blending. Grind until you reach the consistency you like. Because some people enjoy a slightly gritty texture, they might stop earlier. Others prefer extra refinement. In any case, you now hold the base for your future chocolate bar.
Refining Chocolate Liquor: Gaining Extra Smoothness
Refining takes your chocolate liquor to the next level. It reduces particle size and disperses sugar evenly. Professional chocolatiers often pass the liquor through rollers or use stone grinders. These machines break down solid particles, making the final bar velvety.
Furthermore, you can do a smaller-scale refinement at home. After the initial grind, run the paste through a stone grinder or conche for several hours. This extra time helps remove harsh notes and gritty textures. It also promotes flavor development. Continuous stirring forces air into the mixture, and that aeration enhances taste.
In addition, you might include lecithin, a natural emulsifier, to improve the chocolate’s flow. This optional ingredient can simplify molding later. Yet use it sparingly, since a small amount goes a long way. Another choice is adding extra cocoa butter to increase creaminess. Still, you should maintain a good balance between flavor and mouthfeel.
Throughout refining, check on the taste and texture. Stop when it meets your preference. Some prefer a bit of rustic feel, while others want the smoothest texture possible. Besides, the beauty of making your own chocolate bar is the control you get over every aspect. In the end, refining leads to better consistency and even distribution of sugars, flavors, and cocoa solids.
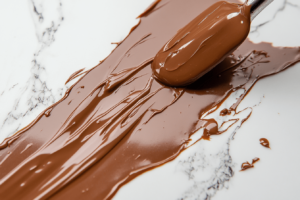
Conching: Developing Flavor and Reducing Bitterness
Conching is like the final polish on a diamond. It smooths out any last rough edges in your chocolate. Furthermore, it shapes the taste by removing unwanted acidic tones. Typically, conching occurs in a specialized machine that works the chocolate liquor at a controlled temperature. Yet if you are at home, a melanger or even a slow, patient stirring can mimic the effect.
During conching, friction and mild heat help evaporate volatile acids. These acids often cause a sharp or sour taste. Additionally, the continuous stirring encourages flavor compounds to unify. This step can last anywhere from a few hours to a full day. Commercial chocolate makers conche longer for a milder, more uniform flavor. Home conching, while on a smaller scale, follows the same principle.
Moreover, conching influences texture. It ensures a less grainy chocolate bar, refining it even further. You can choose the length of time based on your taste test. Shorter conching often preserves some of the bean’s original character. Longer conching produces a smoother but sometimes more neutral flavor. So, explore and see which style you prefer.
When done, your chocolate liquor should smell heavenly. It will taste rich and balanced, with less bitterness. Next, you can move on to tempering. This final step ensures that all your hard work shows up in a glossy, crisp chocolate bar that melts in your mouth.
Tempering: Achieving That Signature Snap
Tempering is all about crystal structure. Cocoa butter, found in chocolate liquor, can crystallize in various forms. But only one form yields the firm texture and shiny surface we love. Tempering is a precise way to encourage the right kind of crystal to form. This might sound complicated, but do not worry.
First, gently heat your conched chocolate to around 115°F to 120°F (about 46°C to 49°C). Then cool it down to about 82°F (28°C). Next, reheat it slightly, this time to about 88°F to 90°F (31°C to 32°C). These temperatures vary based on the type of chocolate: dark, milk, or white. Furthermore, you can temper manually by stirring on a cool marble slab, or you can use a tempering machine. The method you choose often depends on your skill and the size of your batch.
Additionally, keep a close eye on temperature changes. Use a digital thermometer. Stir often to distribute the crystals evenly. If done correctly, the chocolate will have a lustrous finish and crisp snap. On the contrary, if you skip or botch tempering, you risk ending up with chocolate that appears dull or has grayish streaks. This is called bloom, and while still edible, it lacks the desired appeal.
After tempering, proceed quickly to molding. Tempered chocolate sets faster, so it is helpful to have molds ready in advance. This short window is also a fun time to get creative with shapes. Whether you prefer classic bar molds or fun designs, now is your chance to express your personal flair.
Molding and Cooling: Finalizing the Steps of Making a Chocolate Bar
At last, the moment arrives to pour your carefully tempered chocolate into molds. You can find molds in countless shapes and materials, from plastic to silicone. Select one that fits your style. Before you pour, ensure the mold is clean and dry. A moist or greasy surface can ruin the chocolate’s finish.
Gently tap the mold on the counter. This helps release any trapped air bubbles. Additionally, it creates a smooth surface on the bar’s exterior. Then place the mold in a cool room or fridge to set. Avoid extreme cold, as abrupt changes in temperature can cause bloom. Ideally, aim for a room temperature between 65°F and 68°F (18°C to 20°C). If using a fridge, remove the bars once they set. Let them rest at room temperature in an airtight container.
Moreover, if you are decorating your chocolate, do so while it is still slightly soft. Add nuts, dried fruits, or even edible gold dust for a visual treat. It is easy to get creative here. Just remember that any add-ins should be fresh and of good quality.
Once the bars are fully cooled, pop them out of the molds. Take a moment to admire your work. The shine, the snap, the aroma—these are all signs of properly made chocolate. Then package them in foil or wrap if you plan to store or gift them. Although, you might want to sample a piece right away. After all, you have earned it!
Creative Touches: Variations and Flavor Enhancements
If you want to elevate your chocolate further, try adding flavors. A hint of sea salt or a dash of chili pepper can highlight the richness of the cocoa. You might also swirl in caramel or peanut butter for a layered effect. Moreover, experimenting with different sweeteners, such as honey or coconut sugar, can result in unique taste profiles.
For a playful twist, add crunchy textures like puffed rice or chopped cookies. If you prefer a pure, unadulterated taste, stick with plain dark chocolate. Even small changes in technique will yield new flavor sensations. This freedom to adapt is part of why people find chocolate-making so creative.
Furthermore, you can tailor the cocoa percentage. Increase it for a more intense, bitter flavor. Decrease it if you prefer a milder taste. Keep in mind that higher cocoa percentages mean less sugar, so the bar will taste stronger. Conversely, a lower cocoa percentage often brings a sweeter taste. There is no single right or wrong choice. It all depends on your palate.
Whether you add a few nuts or infuse your chocolate with aromatic oils, these final touches inject personality. Thus, each bar becomes a reflection of your tastes. Once you master the basics, you are free to innovate. With every new batch, you will discover more ways to celebrate chocolate’s versatility.
Frequently Asked Questions
What are the steps for making a Hershey chocolate bar?
Hershey follows similar steps to most chocolate producers. They select and roast cocoa beans, then remove shells, grind nibs, and refine the liquor. Next, they conche and temper the chocolate before molding it into their famous bar shape.
What are the 10 steps to making chocolate?
You can break the process into ten concise steps: bean selection, cleaning, roasting, winnowing, grinding, refining, conching, tempering, molding, and cooling.
What are the 7 steps of making chocolate?
Some prefer a simpler overview of seven steps: harvesting cocoa beans, fermenting and drying, roasting, winnowing, grinding, conching, and tempering.
How are chocolate bars made step by step?
Chocolate bars form through a series of logical phases. Beans undergo roasting, nibs get ground into liquor, and then this liquor is conched and tempered. The final pour into molds creates the finished bar.
Conclusion
Chocolate bars do not appear by magic. Rather, they emerge from careful selection of beans, precise roasting, and thorough refinement. From there, conching and tempering refine texture and flavor, leading to that shiny, tasty treat we all know. Making your own chocolate bar involves both skill and patience. Yet it is also very rewarding.
When you follow these steps, you become part of a tradition that spans centuries. It is not just about melting chocolate in your kitchen. It is about crafting a product that carries the taste of faraway lands and the labor of dedicated farmers. In short, learning What are the steps of making a chocolate bar? opens the door to a deeper appreciation of each bite. Next time you unwrap a bar, you can savor the journey from bean to chocolate in a whole new way.